Starting Christine-GIS Viewer 1.2 (build 1.050628), you can distribute your maps on CD together with data using Christine-GIS Viewer. Users will be able to work with your map presentation without installation of any software on their computer. This article describes how you can do it.
Before you start making your map presentation create a directory on your harddisk. In this directory you will create contents of your distribution CD. In the end you will burn all contents of the directory to CD. In this article the directory is called cdrom.
Overview of five steps of making your distribution CD
![]() Step One
Step One
Install Christine-GIS Viewer on your harddisk. Find installation directory (probably C:\Program Files (x86)\Christine-GIS 1.5) and copy it to cdrom directory.
![]() Step Two
Step Two
In cdrom directory create subdirectory where data will be stored. In this article the subdirectory is called data. Copy all data you need to create map presentation to data directory. For large data sets its recomended to create spatial index (*.six files). After you set legend or classify data you can store these settings to legend file (*.leg file). Save spatial index files and legend files together with data.
![]() Step Three
Step Three
Run Christine-GIS Viewer, create your map presentation and save it to project file (project.cri) using relative paths to data. You can enhance your project using following two scripts.
App application;
application.SetName("My Presentation");

MsgBox dlg;
Number nValue;
Bool bValue;

' full file name of icon file
Project proj;
String sProjDir;
proj.GetProjDir(sProjDir);
String sIconFN;
sIconFN = sProjDir + "\\icon.ico";

' open dynamic linked library
DLL myDll;
myDll.Load("user32.dll", bValue);
if (!(bValue)); exit; endif;

' find procedure for loading icon from file
NumberList parameters;
parameters.Add(2);
parameters.Add(1);
parameters.Add(2);
parameters.Add(2);
parameters.Add(2);
parameters.Add(2);
parameters.Add(-1);
myDll.FindProc("LoadImageA", parameters, bValue);
if (!(bValue)); exit; endif;

' call procedure for loading icons from file
Number hBigIcon hSmallIcon;
myDll.CallProcNumInt(hBigIcon, 0, sIconFN, 1, 32, 32, 16);
if (hBigIcon == 0); exit; endif;
myDll.CallProcNumInt(hSmallIcon, 0, sIconFN, 1, 16, 16, 16);
if (hSmallIcon == 0); exit; endif;

' find procedure for sending message to a window
parameters.Empty();
parameters.Add(2);
parameters.Add(2);
parameters.Add(2);
parameters.Add(2);
parameters.Add(-1);
myDll.FindProc("SendMessageA", parameters, bValue);
if (!(bValue)); exit; endif;

' send message for setting application’s icon
Number hWnd;
application.GetMainWindowHWND(hWnd);
myDll.CallProcNumInt(nValue, hWnd, 128, 0, hSmallIcon);
myDll.CallProcNumInt(nValue, hWnd, 128, 1, hBigIcon);

' close library
myDll.Unload();

' show startup banner for three seconds
String sBannerFN;
sBannerFN = sProjDir + "\\banner.bmp";
dlg.ShowBmp(sBannerFN, 3, FALSE, 2);
application.Sleep(3);
' full file name of file with instructions
Project proj;
String sFN;
proj.GetProjDir(sFN);
sFN = sFN + "\\instructions.rtf";
' read contents of the file
File myFile;
myFile.Open(sFN, OPEN_EXISTING);
String sInstructions;
myFile.Read(sInstructions);
myFile.Close();
' show instructions
MsgBox dialog;
dialog.Report(sInstructions, 640, 480);
Script s;
s.AttachDoc("About Presentation");
s.CloseWithLock();
s.AttachDoc("Instructions");
s.CloseWithLock();
![]() Step Four
Step Four
Create autorun.inf file in cdrom directory. Windows detects when a CD is inserted into the CD-ROM drive and runs an application based on the contents of the autorun.inf file located on the CD. Recommended contents of autorun.inf file for your presentation is below.
[autorun]
open="Christine-GIS\Christine.exe project.cri"
icon=icon.ico
![]() Step Five
Step Five
Finally burn contents of cdrom directory to CD medium and test it. When you insert burned medium into CD-ROM drive, Christine will start and load your project. Startup script in project shows welcome banner and changes Christine’s icon and title.
Note: Windows has an option to disable autorun functionality. In this case users must run presentation by double click on project file.
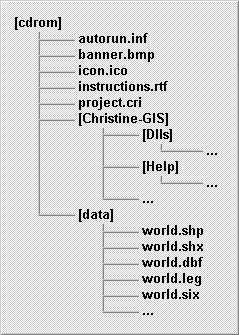
Appendix A – Contents of distribution CD
Following image of directory tree shows contents of distribution CD. All scripts in this article respect this directory tree.